
Get in Touch
Your Trusted Manufacturer of Laptops & Tablets

WhatsApp Us Directly
+86 13923410269
Email Us
Get in Touch
Your Trusted Manufacturer of Laptops & Tablets

The appeal of a portable monitor lies in its ability to pack efficient productivity or immersive entertainment into your backpack—whether you're waiting at the airport, working from a hotel, or gaming on the couch, it can instantly expand your digital workspace. However, the real challenge often begins after unboxing: How do you connect this sleek screen to your device? What cables do you need? Why is there no signal when everything seems plugged in? Adreamer is here to clear all these obstacles. We’ll not only walk you through step-by-step how to connect mainstream devices like laptops, smartphones, and gaming handhelds but also explain how portable monitors work, list essential accessories, and provide quick troubleshooting tips for issues like black screens, no signal, and resolution errors—helping you go from 'struggling to connect' to true plug-and-play performance, unleashing the full potential of this compact screen.

(Portable display Image source: Adreamer)
A portable monitor is an external screen you can take anywhere. It's slim, lightweight, and takes up almost no space in your bag—yet it can connect to your laptop, smartphone, Nintendo Switch, Steam Deck, or other devices with a single cable (such as USB-C or HDMI) to display content instantly. It can even charge your host device, acting like a power bank for your laptop. Whether you want to boost productivity with a second screen at a café or enjoy a larger display for handheld gaming on the go, it easily handles both—like carrying a desktop monitor in your backpack.

(The difference between portable monitors and traditional monitors Image source: Adreamer)
Boost Productivity
Extend your laptop screen into a dual-display setup: check emails on one side while drafting proposals on the other. Eliminate constant window switching and work more efficiently.
Mobile Entertainment
Connect your smartphone, Nintendo Switch, or Steam Deck to instantly transform your handheld device into a compact TV. Enjoy big-screen gaming comfortably wherever you go.
Lightweight & Compact
Lighter than most books, it slips effortlessly into your commute bag or carry-on luggage—perfect for those who frequently work from different locations.
Before plugging in your portable monitor, take a moment to understand your device’s ports and cables—it can save you a lot of troubleshooting later.
Most modern portable monitors support a “one-cable solution”: a single full-featured USB-C cable can handle video transmission, data transfer, and power delivery all at once. No need for separate power adapters or extra video cables—just plug and play. Ideal for on-the-go use.
However, to make this work, your host device (such as a laptop, smartphone, or handheld console) must support USB-C video output, commonly referred to as USB-C with DisplayPort Alternate Mode (DP Alt Mode).
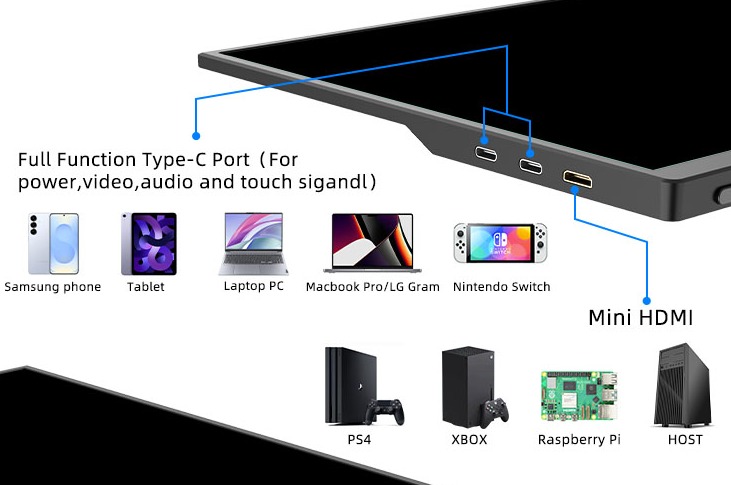
(Portable monitors interface Image source: Adreamer)
USB-C (Full-Featured / with DP Alt Mode): This port not only charges your device and transfers files but also outputs high-definition video. Most recent devices—like MacBooks, Windows ultrabooks, Samsung/Huawei flagship phones, and the Steam Deck—support this.
HDMI or Mini HDMI: The most widely used video port. You can connect your monitor using an HDMI cable, but remember—HDMI doesn’t deliver power. You’ll need a separate USB power cable (usually USB-A to USB-C or Micro-USB) to supply power to the monitor.
Micro-USB (common in older portable monitors): Important note—Micro-USB is typically for power only and does not transmit video! Many users assume it will work for display and end up with a black screen. If you see this port, treat it as a “charging port.”
Pre-Connection Cable Checklist:
If your device has a full-featured USB-C port:
→ Use a USB-C to USB-C cable that supports video transmission (often included with the monitor, but confirm it supports DP Alt Mode).
If your device only has standard USB-A or HDMI ports:
→ You’ll need an HDMI to HDMI cable (for video) + a USB-A to USB-C (or Micro-USB) cable (for power).
Get these right, and you’ll avoid 80% of common connection issues. Plug in—and your screen should light up instantly.
Now that you understand the ports, let's get practical. The connection process is actually very straightforward.
If your laptop (whether Windows or Mac) has a full-featured USB-C port that supports video output (usually marked with a Thunderbolt ⚡ or DP symbol), you're in luck. You only need a single USB-C to USB-C cable to handle both video transmission and power. Once plugged in, the screen should light up automatically.
However, it might default to 'Duplicate Mode' (showing the same content on both screens). To truly boost productivity, you need to switch to 'Extend Mode'—making the portable monitor a second, independent workspace.

(Portable monitor connected to laptop Image source: Adreamer)
On Windows: Right-click the desktop → Select 'Display settings'. You'll see a diagram of the two screens. Select 'Extend these displays' below. Alternatively, press the Win + P shortcut to quickly bring up projection options and use the arrow keys to select 'Extend'.
On macOS: Open 'System Settings' → 'Displays'. Hold the Option key and click 'Detect Displays' if needed. Then, uncheck 'Mirror Displays'. Finally, drag the screen icons to arrange their left/right positions to match your physical setup.
Pro Tip: On some Windows laptops, the external display toggle key (e.g., F4) is often a secondary multimedia function. You may need to press the Fn key combination (e.g., Fn + F4)—check the symbols on your keyboard.
No full-featured USB-C on your laptop? Don't worry, there's a backup plan.
Many older or entry-level laptops only have an HDMI port. In this case, you'll need two cables:
Use an HDMI cable to connect your laptop to the portable monitor's HDMI port (handles video).
Use a USB-A to USB-C (or Micro-USB) cable to provide separate power to the portable monitor from your laptop or a power adapter (because HDMI doesn't deliver power).
Once connected, the system detection works the same as above. Just go into the display settings and select 'Extend' to start using it.
No matter which method you use, once the cables are correct and power is supplied, your laptop instantly gains dual-screen productivity—perfect for working efficiently at a café, airport, or your sofa at home.
Connecting your smartphone to a portable monitor instantly transforms your small-screen content into a large display, making everything from watching videos and working on documents to presenting PowerPoints much more comfortable. However, connection methods vary significantly between devices, so you'll need the right approach for your phone.

(Portable monitor connected to phone Image source: Adreamer)
Most mid-range to high-end Android phones (especially flagship models from 2019 onwards) feature a full-featured USB-C port that supports video output. If your phone supports DisplayPort Alt Mode, a single USB-C to USB-C cable is all you need to transmit both the display signal and power to the monitor—a true one-cable solution.
Important note: Some brands require enabling a specific mode for the full desktop experience:
Samsung phones: Enable Samsung DeX mode for a PC-like windowed interface, ideal for use with a mouse.
Huawei/Honor: Some models support their proprietary EMUI/HarmonyOS Desktop Mode
Other brands (Xiaomi, OPPO, OnePlus, etc.) may only support basic screen mirroring without a desktop mode, but this is still perfect for videos and gaming.
We recommend verifying if your specific phone model supports video output (search '[Your Phone Model] + DP Alt Mode support') before purchase.

(Portable monitor connected to phone Image source: Adreamer)
If you have a Lightning-based iPhone (iPhone 14 or earlier):
Apple's official Lightning Digital AV Adapter is required. The setup involves:
Plugging the adapter into your iPhone's Lightning port.
Connecting an HDMI cable between the adapter and the portable monitor.
Providing separate power to the portable monitor (via a USB power cable to an adapter or power bank), as the Lightning adapter doesn't deliver sufficient power.
This method only enables screen mirroring, not extension, and the adapter is a separate purchase.
If you have an iPhone 15 / 15 Pro or newer (with USB-C):
Great news! These newer iPhones support video output directly from their USB-C port (Pro models support higher resolutions). Simply use a full-featured USB-C to USB-C cable to connect directly to the portable monitor for both video and power, just like modern Android phones. While iOS doesn't support a true extended desktop, screen mirroring is excellent for video playback, presentations, or live stream monitoring.
Whether you use Android or iPhone, with the correct cables and accessories, a portable monitor can turn your pocket-sized device into a versatile large-screen workstation or personal cinema.
Using a portable monitor with your gaming consoles is a fantastic way to enhance your entertainment experience while traveling or in tight spaces. However, connection methods vary significantly between devices—understanding them is key to avoiding the frustration of 'no signal.'

(Portable monitor connected to Switch Image source: Adreamer)
A common misconception is that the Switch's USB-C port can handle a one-cable connection like a laptop. In handheld mode, its USB-C port is for charging and data only, not video output. The correct methods are:
Using the Official Dock: Place the Switch into its dock, which outputs video via HDMI to the portable monitor and provides power to the console.
Using a Compact Third-party Dock (HDMI Adapter): A palm-sized alternative with an HDMI port and a USB-C power input, much more suitable for travel.
For either method, you will need an HDMI cable and must provide separate power to the portable monitor (as the dock's power is for the console). Remember to bring a power adapter or a high-capacity power bank.
These Windows handhelds are extremely friendly towards portable monitors. Their USB-C ports support DisplayPort video output and power delivery. A single full-featured USB-C to USB-C cable delivers a true one-cable solution—handling video, audio, and power simultaneously. The system detects it automatically, and you can fine-tune resolution and refresh rate in the settings for a near-desktop big-screen gaming experience. The Steam Deck's custom display scaling is a perfect match for portable monitors.

(Portable monitor connected to Xbox for gaming Image source: Adreamer)
Connecting these home consoles is arguably the most straightforward process, as they have standard HDMI outputs:
Use a single HDMI cable to connect the console directly to the monitor.
Use a USB cable (typically USB-A to USB-C/Micro-USB) to provide separate power to the portable monitor from the console or a wall outlet (HDMI does not deliver power).
While not truly mobile, a portable monitor is a brilliant space-saving and flexible display for dorms, temporary setups, or casual gaming sessions.
Pro Tip: Some portable monitors default to the USB-C input source. When using HDMI, you may need to manually switch the input source using the monitor's physical buttons or OSD menu. Check the manual the first time you set it up.
Check all cable connections are secure.
Ensure your USB-C cable is 'full-featured,' not just for charging.
Try providing separate power to the monitor (if supported).
Toggle the display output mode on your host device (e.g., use Win + P on Windows).
The host's USB-C port may not supply sufficient power. Try using a higher-wattage power adapter to charge the host device.
Try using a higher-quality cable.
Check the ports for dust or physical damage.
Ensure the data USB cable is connected (or you're using a one-cable solution).
Install the portable monitor's touch driver on your computer.
(Portable monitors applications for professionals Image source: Adreamer)
If you demand extreme image detail and color accuracy, focus on these specs:
Resolution: Minimum 2K (2560×1440), with 4K being ideal for sharper text and image edges.
Color Gamut: Look for at least 100% sRGB coverage. For print or high-end video, prefer Adobe RGB or DCI-P3 support.
Aspect Ratio: 16:10 offers more vertical space than standard 16:9, displaying more code, timeline tracks, or document content.
Factory Calibration: High-end models often include a color accuracy report with Delta E < 2, which is crucial for professional work.

(Portable monitors gaming applications Image source: Adreamer)
Fluidity and response speed are more critical than color range:
High Refresh Rate: Prioritize models with 120Hz, 144Hz, or higher for smoother gameplay in fast-paced titles.
Low Response Time: Aim for 5ms or less to avoid motion blur during quick movements.
Compatibility: Ensure the monitor supports your device's output specs (e.g., G-Sync/FreeSync support for Steam Deck reduces screen tearing).
Size vs. Portability: 15.6-inch is standard, but 13.3-inch might be more travel-friendly if you're often on the move.

(Portable monitors office applications Image source: Adreamer)
Prioritize practicality and value over top-tier specs:
1080P (1920×1080) Resolution is perfectly adequate, offering clear visuals at an affordable price.
Weight under 600g with a slim profile and protective case makes it easy to carry in a commute bag.
Reliable Ports: A combination of full-featured USB-C + HDMI provides the most flexibility across devices.
Built-in Stand or Adjustable Angles adds convenience for desk use without needing extra accessories.
In short: Professionals prioritize color accuracy, gamers need smooth performance, and everyday users want value. Identify your primary use case first, then match the specs to find the portable monitor that's 'just right' for you.
As you can see, connecting a portable monitor is a straightforward process centered around understanding the convenience of the 'one-cable solution' and having the correct cables ready. It is far from a complicated accessory—it's a powerful partner that can instantly enhance your productivity and entertainment. Now, take out your devices, follow the Adreamer 2025 Portable Monitor Connection Guide, and unlock the benefits of a dual-screen mobile lifestyle today
Industry-Specific Solutions
Latest Blog

White Label AI Mini PC Factory CE FCC Certified Export Wholesale
A deep dive into sourcing, certifying, and scaling your private-label AI edge computing business—covering core hardware platforms (Intel Core Ultra, AMD Ryzen AI, Rockchip NPU), mandatory global certifications (CE, FCC, RoHS, UKCA), and the critical factory audit checklist for bulk wholesale procurement.

Top AI Mini PC Manufacturers for Local LLM Private Deployment in 2026
2026 global overview of AI Mini PC manufacturers for local LLM private deployment. Compare 5 categories, top brands, OEM/ODM options, pricing, customization, and procurement checklist. Find your ideal supplier.
AI Mini PC vs Regular Mini PC: What’s the Difference?
What’s the difference between an AI mini PC and a regular mini PC? Compare NPU compute, local LLM performance, price, power, and use cases. Find out if the extra cost is worth it for your needs.

AI Mini PC OEM/ODM Custom Manufacturing
Professional AI mini host OEM/ODM manufacturer, supporting AMD Ryzen AI/Intel Core dual platforms, with a maximum NPU comprehensive computing power of 126 TOPS, and can pre install six AI agents including OpenClaw, QClaw, KimiClaw, JVSClaw, WorkBuddy, and ArkClaw, with integrated software and hardware delivery.
Adreamer

© 2012-2025 Copyright Shenzhen Adreamer Technology Co., Ltd.粤ICP备18115621号-2
Contact Adreamer Today for Your Custom Solution & Quote!
© 2012-2025 Copyright Shenzhen Adreamer Technology Co., Ltd.粤ICP备18115621号-2