More and more people are purchasing portable monitors—for mobile work, gaming entertainment, and professional content creation—and they truly offer incredible convenience. However, many first-time users encounter the same initial problem after unboxing: How do I actually connect this thing?
- Plugged it in and nothing happens?
- Why won't my phone display?
- My Switch connects but there's no sound?
- Why do the colors look wrong?
If you can't figure these issues out, even the best screen becomes a useless accessory. Today, Adreamer presents a truly beginner-friendly, hands-on tutorial. We'll guide you step-by-step through connecting devices, setting resolutions, adjusting colors, and troubleshooting common problems—so you can master your portable monitor.
Whether you're a Windows laptop user, a MacBook owner, a smartphone power user, or a Switch gamer, reading this article will ensure you get up and running with ease.
1. Pre-Connection Preparation – First, Understand Your Ports
Before you start connecting anything, take one minute to understand what ports your devices have. This alone will help you avoid 90% of connection issues.

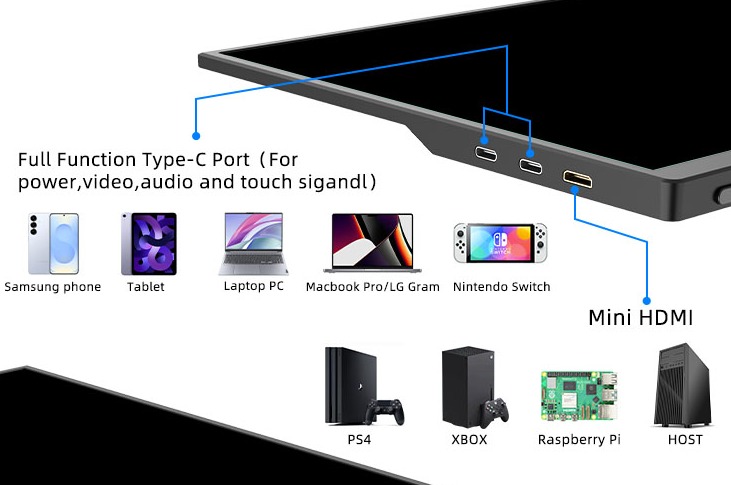
① Ports on the Portable Monitor Side
Most portable monitors come with two types of ports:
Full-Function USB-C Port (usually 1 or 2)
- Function: Transmits video signals, touch data, and powers the screen
- Key Feature: One cable solves everything
Mini HDMI Port
- Function: Transmits video signals only (video only, no power delivery)
- Key Feature: Needed for connecting game consoles and older laptops
② What Ports Does Your Device Have?
Scenario A: Full-Function USB-C Devices
- Mainstream thin-and-light laptops from 2020 onwards (MacBook, Huawei MateBook, Lenovo Yoga, etc.)
- Smartphones that support DP output (Huawei Mate series/P series, Samsung S series, select Xiaomi flagships)
- iPad Pro/iPad Air (USB-C models)
- Windows handhelds like Steam Deck, ROG Ally
Scenario B: Devices with HDMI Only
- Older laptops (HDMI or VGA only)
- Nintendo Switch (original model, non-OLED)
- Desktop PCs
- TV boxes
Scenario C: Devices with USB-A Only
- Many older computers have only USB-A ports
- Important Note: USB-A cannot transmit video signals directly; you'll need a special adapter.
2. Connecting Your Devices – Platform-by-Platform Guide
How to Connect a Windows Laptop
Scenario 1: Laptop Has Full-Function USB-C
This is the simplest connection method:
- Use the full-function USB-C cable included in the package (note: not a standard phone charging cable—those only charge and don't transmit video).
- Plug one end into the laptop, the other into the portable monitor.
- Wait a few seconds; the screen should power on automatically.
If nothing happens:
- Check if the cable supports video transmission (the packaging should mention 'Supports DP Alt Mode').
- Try the other USB-C port (some laptops have only one port that supports video output).
- Press Win + P on your keyboard and select 'Extend' or 'Duplicate.'
Scenario 2: Laptop Has Only HDMI
- Prepare an HDMI cable (standard HDMI to Mini HDMI, depending on your monitor's port).
- You'll also need to power the portable monitor: use a USB-C cable to connect the monitor to a wall charger or power bank.
- Once connected, press Win + P to select your display mode.
Power Supply Notes:
- Portable monitors consume about 5-15W. A standard phone charger (5V/2A) is sufficient.
- If you want to power the screen directly from your laptop, the laptop's USB-C port needs to support PD output (most thin-and-light laptops do, but gaming laptops may not).
Detailed Guide for Connecting MacBooks
MacBook users have a natural advantage: all MacBook USB-C ports support video output.
Connection Steps:
- Connect the MacBook and portable monitor using a full-function USB-C cable.
- The screen will light up automatically, defaulting to extended mode.
- To adjust: Go to System Settings → Displays → Arrangement.
macOS-Specific Tips:
- Mirror Mode: Check 'Mirror Display' – ideal for showing something to a client.
- Switching Primary/Secondary Screen: Drag the white menu bar to the screen you want as your main display.
- Resolution Adjustment: In 'Display Settings,' you can choose 'Default' or 'Scaled.'
Note: Touch functionality on some portable monitors may not work with Mac, or might require driver installation. You can confirm this before purchase.
How to Connect a Portable Monitor to a Smartphone
Prerequisite: Your phone must support DP video output. Not all phones do!
Phone Brands that Support DP Output:
- Huawei: Mate series, P series flagships (e.g., Mate 60 Pro, Pura 70 Pro)
- Samsung: S series, Note series (S22/S23/S24 series all support it)
- Xiaomi: Select flagships (e.g., Xiaomi 13 Ultra, 14 Ultra)
- Honor: Magic series flagships
- Sony: Xperia series
- Others: Very few. Check your phone's specifications before purchasing.
Phones that Do NOT Support DP Output:
- iPhone (requires a special adapter, detailed below)
- The vast majority of mid-range and budget Android phones
- Most OPPO/vivo models (only a few flagships support it)
Connection Steps (Android Phone):
- Connect the phone and portable monitor using a full-function USB-C cable.
- The phone will likely prompt 'Wired Projection' or automatically start mirroring.
- On some phones, you may need to manually enable 'DP Output' in the quick settings dropdown menu.
How to Connect an iPhone?
The iPhone's Lightning port and standard USB-C ports (excluding iPhone 15 series) do not support video output. You'll need:
- Option A: Use a Lightning to HDMI adapter (Apple official or certified brand).
- Option B: Wireless screen mirroring (if your portable monitor supports AirPlay).
- Option C: iPhone 15 series can connect directly with a full-function USB-C cable (some models support it).
Connecting a Nintendo Switch
The Switch is an excellent companion for a portable monitor, transforming the 'handheld into a console' experience.
Switch OLED Model / Battery Life Model:
- Connect the Switch and portable monitor directly using a full-function USB-C cable.
- The Switch screen will display directly on the monitor.
- Audio will output through the portable monitor's speakers.
Original Switch (Non-OLED):
The original Switch's USB-C port does NOT support direct video output. You'll need:
- Use the original Switch dock.
- Connect an HDMI cable from the dock to the portable monitor.
- Power the portable monitor separately.
Power Supply Issue:
- When the Switch is directly connected to the portable monitor, the monitor may draw power from the Switch, causing the Switch's battery to drain faster.
- Solution: Use a power injection cable (one end to Switch, one end to monitor, one end to a charger).
Connecting an iPad
Connection for iPad Pro and iPad Air (USB-C models):
- Connect the iPad and portable monitor using a full-function USB-C cable.
- The iPad screen will mirror automatically.
- Touch support works on some models.
iPadOS-Specific Features:
- Extended Mode: iPadOS 16 and later support using an external display as an extended screen (requires app adaptation).
- Sidecar: Use with a Mac to turn your iPad into a second screen for your Mac.
3. Resolution and Display Mode Settings
3.1 Windows System Settings
- Adjusting Resolution: Right-click on the desktop → Display Settings; select the monitor you want to adjust (1 or 2); choose the recommended resolution from the 'Display resolution' dropdown (usually the monitor's physical resolution).
- Switching Display Modes (Win+P):
- Arranging Displays in Extended Mode:
3.2 macOS System Settings
- Adjusting Resolution: System Settings → Displays; select the portable monitor; choose 'Scaled' under Resolution and select the appropriate option.
- Arranging Displays: Click 'Arrange' in the Displays settings; drag the screen positions to match your physical layout; the white menu bar indicates the main display.
3.3 Android Phone Settings
Most Android phones default to mirror mode when connected—the phone and screen show the same content.
To use extended mode (e.g., watch a video on the big screen while browsing WeChat on your phone), you need:
- Some brands support a 'Desktop Mode': Samsung DeX, Huawei PC Mode.
- After connecting, select 'Enter Desktop Mode' from the notification dropdown.
- The phone becomes a touchpad, and the monitor displays a desktop-like interface.
4. Color Management – Making Your Screen Display Accurately
Many beginners complain that their portable monitor 'looks wrong,' but often it just hasn't been calibrated.
Why Do the Colors Look Off?
There could be three reasons:
- Different Color Gamuts: Your laptop might be sRGB, while the portable monitor is DCI-P3—different color spaces.
- Color Temperature Differences: Some screens run warmer (yellowish), others cooler (bluish).
- Default Mode: Many monitors ship in 'Vivid Mode,' which oversaturates colors.
Basic Calibration Steps
a. Reset to Factory Defaults
First, reset all image settings (brightness, contrast, color temperature) on the monitor to their default values.
b. Adjust Brightness
Match the screen brightness to your ambient light—don't make it too bright or too dim.
c. Select the Correct Color Gamut Mode
Most portable monitors offer several color modes:
- Standard Mode: sRGB, suitable for daily office work and web browsing.
- Movie Mode: DCI-P3, suitable for watching videos.
- Professional Mode: Adobe RGB, suitable for photo editing.
- User Mode: Customizable.
Choose based on your usage scenario; don't blindly select 'Vivid.'
d. Adjust Color Temperature
- 6500K is the standard color temperature, appearing slightly warm.
- If the screen looks too yellow, adjust towards a cooler setting (increase blue).
- If the screen looks too blue, adjust towards a warmer setting (increase red).
Advanced Calibration (For Professional Needs)
If you work in design, photography, or other fields with strict color requirements, using a calibrator is recommended, such as Spyder or i1 Display.
- Place the calibrator on the screen.
- Run the software to automatically generate an ICC color profile.
- Windows/macOS will load this file automatically.
If you don't have a calibrator, find some standard reference images (skin tones, blue sky, grass) and adjust by comparing across different screens.
Common Color Issue Troubleshooting
| Problem | Possible Cause | Solution |
|---|
| Colors too vivid | 'Vivid Mode' is enabled | Switch to sRGB or Standard mode |
| Yellowish tint | Color temperature too low | Adjust color temperature to 6500K or higher |
| Bluish tint | Color temperature too high | Lower the color temperature |
| Low contrast | Incorrect brightness setting | Adjust brightness and contrast |
| Skin tones look green | Wrong color space selected | Check if Adobe RGB mode is accidentally enabled |
5. Common Problem Troubleshooting – What to Do When You Encounter Issues?
Issue One: Black Screen, No Signal
Troubleshooting Steps:
- Check Cable Connections: Are both ends firmly plugged in? Is the cable itself good? (Try swapping it out.)
- Check Input Source: Is the portable monitor set to the correct input source? (Type-C or HDMI?); some monitors require manual switching—look for the 'Input' button.
- Check Device Output:
- The Universal 'Turn it Off and On' Fix: Unplug all cables, wait 10 seconds, and reconnect.
Issue Two: Can't Charge, Battery Drops While in Use
Cause: The portable monitor is drawing power from your device, but the device can't supply enough.
Solutions:
- Use a Power Injection Cable (Y-Cable):
- External Power Supply: Power the screen directly using a wall charger.
- Reduce Screen Power Consumption: Lower the brightness or turn off high refresh rate (if supported).
Issue Three: Touch Not Working
Troubleshooting:
- Confirm Device Support: Windows supports touch, but may need a driver (for some models); Mac does not support touch by default; Android supports it, but you need to confirm compatibility.
- Check Connection Method: With a single USB-C cable, the touch signal travels through the same cable. If using HDMI, touch requires a separate USB connection.
- Install Drivers: Some portable monitors require a touch driver to be installed on Windows. Download it from the official website or ask customer support.
Issue Four: Screen Lag, High Latency
Possible Causes:
- Refresh rate set too high (e.g., set to 120Hz, but the device output is unstable).
- Poor quality cable (too long, too cheap).
- Insufficient device performance (older computer struggling with high resolution).
Solutions:
- Lower the resolution or refresh rate.
- Swap for a shorter, higher-quality cable.
- Close other resource-intensive programs.
Issue Five: No Sound
Cause: Audio is being sent via HDMI/Type-C to the portable monitor, but the monitor isn't producing sound.
Troubleshooting:
- Check Volume: Does the portable monitor have its own volume control? Try turning it up. Also check if your device's volume is maxed out.
- Check Output Device:
- Test with Headphones: If the screen has a headphone jack, try plugging in headphones. If you get sound, the screen's built-in speakers might be the issue.
6. Portable Monitor Usage Tips
6.1 Protecting the Screen
- Portable monitors are fragile. Always put them in their protective case when not in use.
- Avoid pressing firmly on the screen, especially OLED panels.
- Clean with a microfiber cloth (like for glasses). Avoid alcohol, as it can damage coatings.
6.2 Cable Management
- Get a small cable organizer pouch to keep your USB-C cable, HDMI cable, and charger together.
- Pack it when you travel, so everything is ready when you need it.
6.3 Using the Stand
- Most portable monitors come with a built-in stand or a case that doubles as a stand.
- Adjust it to a comfortable angle to avoid glare.
- If your desk is uneven, you can place something under the stand for stability.
6.4 Power Solutions
- Short-term use: Power from your laptop (reverse charging).
- Long-term use: External wall charger.
- On-the-go use: Power bank (recommend 10,000mAh or larger).
Portable monitors aren't that complicated. Once you understand the port types, master the correct connection methods, and learn the basic settings and troubleshooting, it can become a powerful assistant for your mobile office, entertainment, and creative work.
If you encounter any issues during setup that weren't covered in this article, feel free to leave a comment below, and we'll do our best to help you out.